GraceNote automatically saves changes locally. To save the changes to the server as well, so that other users can see them, you need to select the Save option from the File menu.
Each time you open a project, GraceNote checks the server for file changes from other users and downloads them. This can also be manually triggered at any time using the File -> Update menu option.
Each text entry in is assigned a "status" that indicates how much work has been done on that entry. To more easily work with this, various options on how the entry status is updated are available.
First off, you can set your own Role to one of the status stages. This highlights entries at a lower status in red and entries at the current or higher status in green, and affects what status the program automatically sets modified or viewed entries to according to the current Mode.
There are three Modes: Semi-Auto Mode is the default, which automatically updates the status of all entries you modify to the current Role. If you're at a stage where it's less about modifying every entry and more about making sure the current translation is accurate or sounds good, you might want to switch to Auto Mode, which also updates the status of all entries that have been viewed in the Entry Display in the middle. And for completion's sake, Manual Mode does not automatically update the status at all.
In addition to that, two protection mechanisms exist to prevent erroneous automatic status changes. One, Semi-Auto and Auto will not update the status of an entry that is already on a higher status than the current role. This can be changed in the Preferences. Two, Auto mode supports a threshold, which causes only entries that have already reached a specific status to be updated by it. This can be used to more easily work with databases that only have been partially translated.
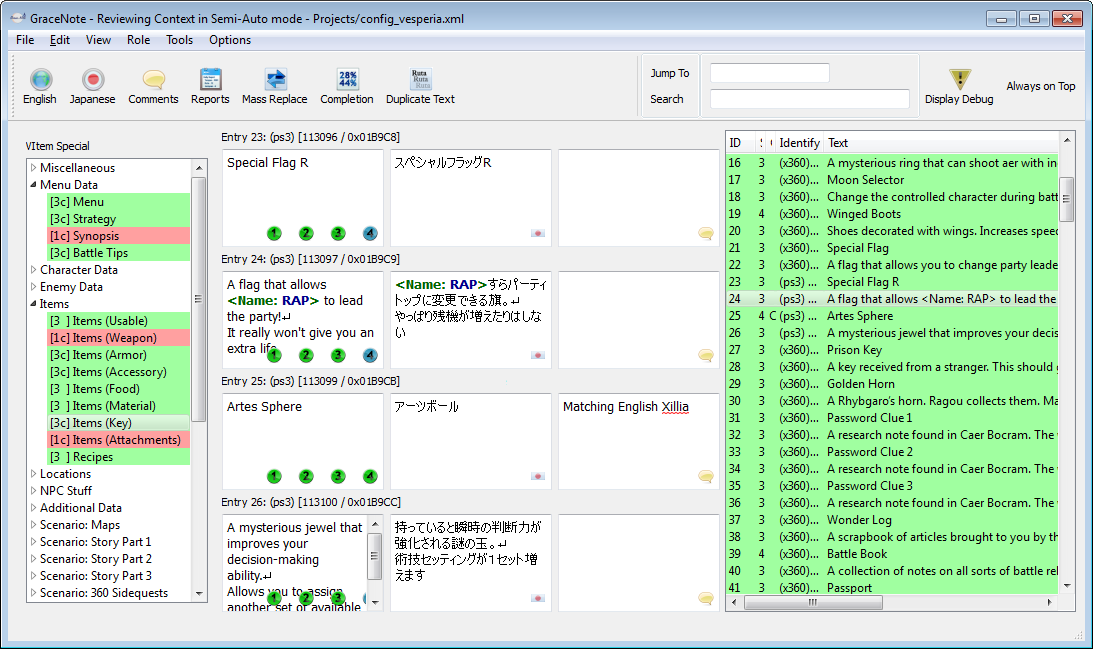
The Main Window is where you'll do most of your translating and editing. It's split into four sections: The Toolbar at the top, the Database List to the left, the Entry List to the right, and the Entry Display in the middle.
To the left, you'll see a categorized list of all databases. In addition to the name of the database, it will also display a number, which indicates the lowest status of all entries contained in it, and a color: Green means that all work is done for that file in the current translation stage, red means there's still stuff to do. It may also display a "c" next to the status number, which means at least one entry has a comment.
Just select any of the databases to load its contents into the Entry List to the right.
The Entry List shows all entries contained in the currently selected database. By default, it shows all possible information, but columns may be hidden by right-clicking the header.
Selecting any entry fills it and the surrounding entries (one above and several below, depending on how many entries you choose to display in the settings) into the Entry Display in the middle of the screen, ready to be modified.
Each entry corresponds to one string of text in the game. Depending on the game and type of string, this may be as little as a word, or as much as a whole paragraph.
Here you'll actually modify the game text. The Entry Display is right in the middle of the program, and shows a configurable amount of entries, from a minimum of 3 all the way up to 20, if your screen resolution can handle it.
The second entry will always be the one that you've selected in the Entry List, and the one that keyboard shortcuts such as CTRL + digit (change status) affect.
Assuming you haven't turned any of the columns off, the left column will display the current English translation, which you can change, the middle displays the original Japanese, and the right displays a comment on that entry, which is also freely editable.
The circles below the English translation represent the current status of the entry. You can manually change the status of an entry by clicking on those circles. Please refer to the general usage information for an explanation of the status.
Text shown between <pointy brackets> is a variable or control code, which gets replaced in-game by something else. They should usually be fairly self-explanatory and are entirely game-specific.
To distinguish between line breaks added because the text automatically wrapped and line breaks that were actually placed (and thus would show up in-game), actual line breaks are ornamented by a carriage return symbol (↵). It is not necessary to manually add this when adding a line break, a simple new line with Enter is fine.
If spellchecking via PyEnchant is installed, words that were not recognized will be underlined in red. You can right-click on those to display a list of spelling suggestions.
GraceNote also has a built-in Japanese dictionary. Just highlight and then rightclick any set of Japanese characters to get possible translations for that word or phrase. The dictionary used is an abridged dictionary. It also includes a very succinct kanji lookup.
The Toolbar at the top of the window allows quick access to several useful tools and features.
The English, Japanese, and Comments buttons allow you to hide that section of the Entry Display. Press again to show again.
The Reports, Mass Replace, Completion, and Duplicate Text buttons open that specific tool in a separate window. Please refer to their manual pages to find out more about them.
The Jump To box allows you to quickly jump to a specific database if you know its filename but don't want to search for it in the list to the left. Just type in the name and press Enter.
The Search box allows you to quickly find entries containing text you search for. For more involved Search features check out the Mass Replace tool.
The Display Debug button toggles visibility of entries that have been marked as Debug, which are hidden by default. To mark an entry as Debug, check the checkbox in the "Debug?" column of the Entry List. This will hide all entries across all databases that have the same Japanese original text, so be careful with what you mark as debug.
And finally, the Always on Top button makes the program stay on top of other windows.
A lot of menu options are self-explanatory, but here's a few of them that might not be.
File -> Save, File -> Update - This saves and retrieves changes to/from the server. Refer to the general usage information for more information.
File -> Revert - Warning! This throws away all changes made since the last save to the server. Handle with caution.
File -> Find Unsaved Databases - This searches all databases for changes that were not yet uploaded to the server. Use in case the program crashes in the middle of a session, or when you've changed the translation of entries via external tools.
Edit -> Full Text Copy - This copies the contents of the currently opened database to the clipboard.
Role - Use this menu to change the current role, mode, or threshold. Refer to the general usage information for more information.
Tools -> Propagate Debug - If you've changed the debug status of entries via external tools, you can use these options to sync that status to other entries using the same original Japanese text.
Tools -> Refresh Completion Database - This refreshes the cached data on how many entries are at what stage in which database, which is used to display the data in the Completion window as well as color in the databases in the Database List. You shouldn't have to run this ever, but if the data becomes incorrect for whatever reason, you can use this to fix it.
Tools -> Find Used Symbols - This saves a file containing a set of all characters used in the entire body of game text to "used_symbols.txt" in the GraceNote directory. Useful if you're creating a font and need to know which glyphs should be available.
The Changelog displays when a database was changed, and who made the changes.
It comes in two flavors: The Local Changelog displays only information of the currently opened database, while the Global Changelog displays all changes of all databases. In the Global Changelog, you can doubleclick on a database to jump directly to it.
This displays detailed information on how much of each database and database category is in what translation status, or in other words how far along the project is.
The Duplicate Text tool allows you to quickly find all entries that are the same in Japanese, but not the same in the translation (yet). This can be very useful for applying a translation of common text over the whole game, such as in cases where the same system or event text is duplicated across multiple game files. You can also use it to make sure you haven't accidentally translated some things inconsistently that should stay the same.
The tool can filter according to database categories, for example when you only want to duplicate check within the system text but not in dialogue. Check the database categories that should be checked, then hit Search.
By default, only inconsistent translations are displayed. This includes entries that are translated the same but are not on the sametranslation status. You can change this to displaying all duplicates using the radio buttons at the top.
After searching, all duplicates are displayed in a list, nesting all existing translations under the original Japanese entry. To match an inconsistent translation, simply double-click the desired translation. This will automatically open up and fill the Mass Replace tool in a way where all you need to do is hit Replace to match the translation.
Mass Replace is a powerful tool for searching and replacing text across files.
To search for any string, simply enter that string into the Search For textbox and hit the Search button. The results, if any, will be displayed in the big window below. Doubleclick any of the results to jump directly to that entry in the main window.
You can adjust searching behavior in several ways:
Search results will be displayed in tabs. To close a set of results, switch to that tab and hit the Remove Tab button at the bottom.
To mass replace text within the search results, enter the desired new text in the Replace With textbox, check the "Replace" checkbox next to all entries that should have text replaced, and hit the Replace button. This will replace the string of the original search within the English entry with the new string in the Replace textbox. Replacing text in the Complete Entry mode will always result in the whole entry being set to the text in the Replace With box. Replacing will also close the set of search results.
Note that this cannot be reverted unless you hit the Revert option in the main window to discard all changes since the last save to the server.
Replacing text via mass replaces changes an entry's status in the same way as if you had manually edited it and not hit any of the status buttons. In other words, it respects the current translation mode and status updating preferences.
This just displays some statistics on recent and all-time translations.
The Font Window can display an entry's text content as it would show up in-game. This can be very helpful to check things, such as:
You can right-click within the font window to toggle it being always on top of other windows.
This window needs to be properly configured in the project config file. Refer to the project setup page for more information.
The History window displays past versions of the currently selected entry.
The window is split into three sections: The top displays a list of all changes, the columns listing when the entry was changed by which user, what status it was at that point, and what parts of the entry (English, Status, Comment) were changed. Click on any of them to display how the entry looked after that change in the two sections below: The English text in the middle, and the Comment at the bottom.
By default it always displays the version right before the current one.
The media display window can be used to show images related to the current entry. For example, it can display the current character poses in Visual Novel-style conversations.
This window needs to be properly configured in the project config file. Refer to the project setup page for more information.
| Shortcut | Function |
|---|---|
| Ctrl+Up or Alt+Up | Move upwards in the Entry List. |
| Ctrl+Down or Alt+Down | Move downwards in the Entry List. |
It is possible to reference other databases and/or entries within comments in a way GraceNote recognizes. By placing a database name, entry ID, or both in [square brackets], you can then rightclick on that text to get the option to directly jump there.